Using Land or Cell Phones with Contivio
Contivio can be used with land lines or cell phones in environments that do not support VoIP due to an incompatible network, firewalls, bandwidth limitations, or significant delay due to satellite or terrestrial radio (Metro WiFi) internet service providers.
There are three options for using Contivio on your mobile device:
There are three options for using Contivio on your mobile device:
- Sign into Contivio on your computer using the "Land or Cell Phone" option - This is a great option for agents who are using their computer but don't have a reliable internet connection.
- Sign into Contivio on your smartphone - This is a great option for agents who want to use Contivio on the go to take and make calls.
- Use the Bria app on your smartphone - This is another great option for agents who want to use Contivio on the go to take and make calls. Note that there is a fee of $9.99/year or $0.99/month to use this option, but you can start with a 7 day free trial to see if it's the right choice for you.
1. Using Land or Cell Phone Mode in your Contivio App
If you are a remote agent who is located far away from a major city, or a traveling agent who works from hotels or public spaces that have limited WiFi, you may want to consider using this option.
|
The benefit of logging in with "Land or Cell Phone," is that you will still be able to get screen pops on your computer and have the ability to record calls and update your CRM.
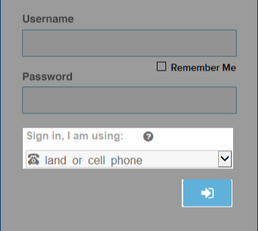
Important Note: If you're using the Land or Cell Phone option, it is important that you always keep your status up to date and log out when you're done. If you don't log out, you may still receive phone calls on your land or cell phone when you're not ready. Step 1: Simply log into the Contivio app as you normally would, but select the 'land or cell phone' option as seen in the highlighted area (see screenshot). |
|
|
Once logged in, if you are greeted with a "Phone not available" error message, this means that the 'Offline Phone' number isn't yet configured.
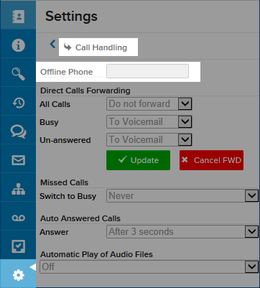
You can configure the landline or cell phone number by going to 'Settings' > 'Call Handling.' If you find that the field 'Offline Phone' is disabled and not available to edit, it is likely because your Contivio account does not have the edit permission, which is configured by your Contact Center administrator. To use this option, please contact your administrator and ask them to enable you to use an Offline Phone Number. The steps to do this are found in our Administrative Guide here. |
|
|
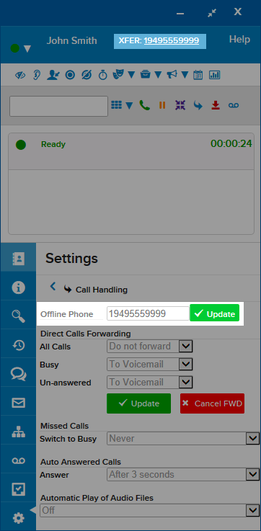
Step 2: Once you are able to edit the 'Offline Phone' field, enter your preferred phone number and click on the green 'Update' button to have this change take effect immediately.
Once you input your phone number, a 'XFER' message will appear at the top with the phone number you just typed in. If you input your phone number as-is, when you receive a call, the caller ID will be your company phone number. If you input your phone number and then put a "#" after it, you will instead see the caller ID number of the customer who is calling. For example: If my offline phone # is 9495559999, I will see my company phone # as the caller ID for inbound calls. If my offline phone # is set to 9495559999#, I will see my customer's phone # as the caller ID for inbound calls instead of my company number. Step 3: After your offline phone number is set, you will continue to use the Contivio app as you normally would. The only difference is that your land line or cell phone will ring instead of your computer. Again, it is important to note that your status must be up to date at all times. For example, if you are busy and you decline an inbound queue call from your land line or cell phone, the call will go to your Voicemail instead of the next person in queue. |
|
2. Logging into Contivio from your Smartphone
With Contivio you also have the option to login using your cell phone. Just contact us at [email protected] and we will send you the URL that you will need in order to login.
The benefit of using Contivio on your mobile device is that you'll be able to access the same tools that you use on your computer. However, there are a few drawbacks to using this option as it is not a fully mobile optimized experience.
To login on your cell phone, enter the URL that the support team provides into your mobile browser. From there, login using "Land or Cell Phone" mode and follow the steps above from option 1. Again, note that you will want to keep your status up to date and make sure you log out when you're done so you don't continue to receive calls.
3. Using Bria on your Smartphone
|
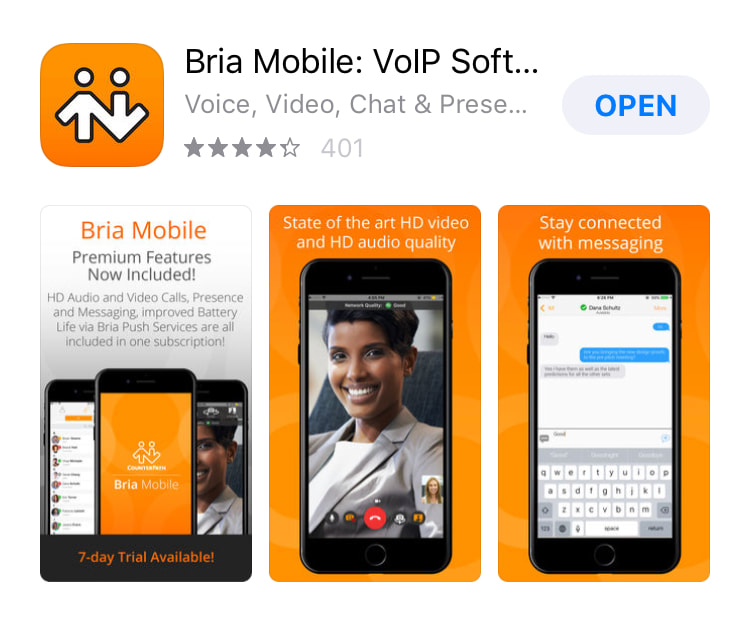
If you're looking for a truly mobile experience, the last option that we recommend is using the Bria Mobile app to take and make calls. Below are the steps to use Bria with your iPhone.
Note: Before you're able to use Bria with Contivio, you need to make sure that you have a numeric password set up. To change your password, go to Settings > Security and change it to a numeric password. Step 1: Download the Bria Mobile App from the iTunes store. Once you download it and open it up, it will prompt you to select your subscription plan (either annual or monthly) and then the phone will ask if you would like to allow Bria to access the microphone, your contacts and push notifications. Please select "OK" or "Allow" for all of these to get the best experience. |
|
|
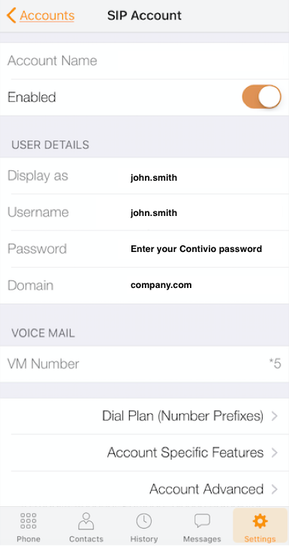
Step 2: From there you will need to select your provider. Select the "VoIP (SIP) - Calling option" under "User-Defined Generic Accounts" and input your Account details:
Step 3: Once you've set up your account, click on "Account Specific Features" at the bottom and make sure that both "Use Push Notifications" and "Single Device Emulation" are switched on. Step 4: After you've completed the steps 1-3, click on “Account Advanced” on the bottom of the SIP Account settings page. Before you can move forward with setup, you'll need to contact your Contact Center administrator or our team at [email protected] for the Out.Proxy address. All of the other advanced settings should remain as-is. |
|
Step 5: After you've updated the Out.Proxy address, you'll want to go back to the main Settings page and make sure the "Enabled" button is activated. If you are not able to slide the Enabled button to activate it, you may need to close the app and reopen it again.
Step 6: Finally, after your account is set up, you'll need to login to your phone before you can take or make calls, otherwise you'll get an error message that says "your phone is not logged in." To do this, press "Phone" on the bottom left, and type in:
*1 + (Your Extension) + (Your Password)
So if your extension is 1001 and your password is 99999999 you would need to type in: *1100199999999 and then click dial. You will need to log in every time you use the app to take & make calls.